Disable Superfetch Windows 10 Cmd / How to Disable Superfetch in Windows 10, 8, 7 Solved : On it write the command as net.exe stop superfetch and hit enter to execute the command.. Superfetch is a windows service that aims to improve system performance over time. Finally, your superfetch service or we can say the feature is disabled. There are scenarios wher you might want to disable superfetch in windows 10. If you prefer to work with the command line, there are a few simple commands you can use to enable or disable the superfetch service. So, this was the simple method to disable superfetch in an easy way.
Disable superfetch with the use of command prompt if people are easily accessing the command prompt, then there are few of the commands which they can use for the disabling of the service of superfetch. Select the start menu, type services, and select the services app. Press win + r shortcut keys on the keyboard to open the run dialog. Firstly, open the command prompt in the mode of the administrator. Enable or disable superfetch (sysmain) using command prompt.
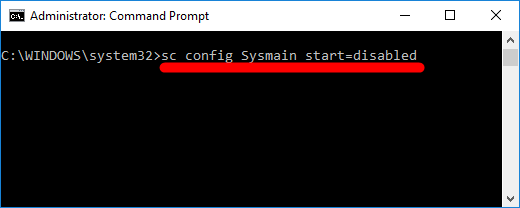
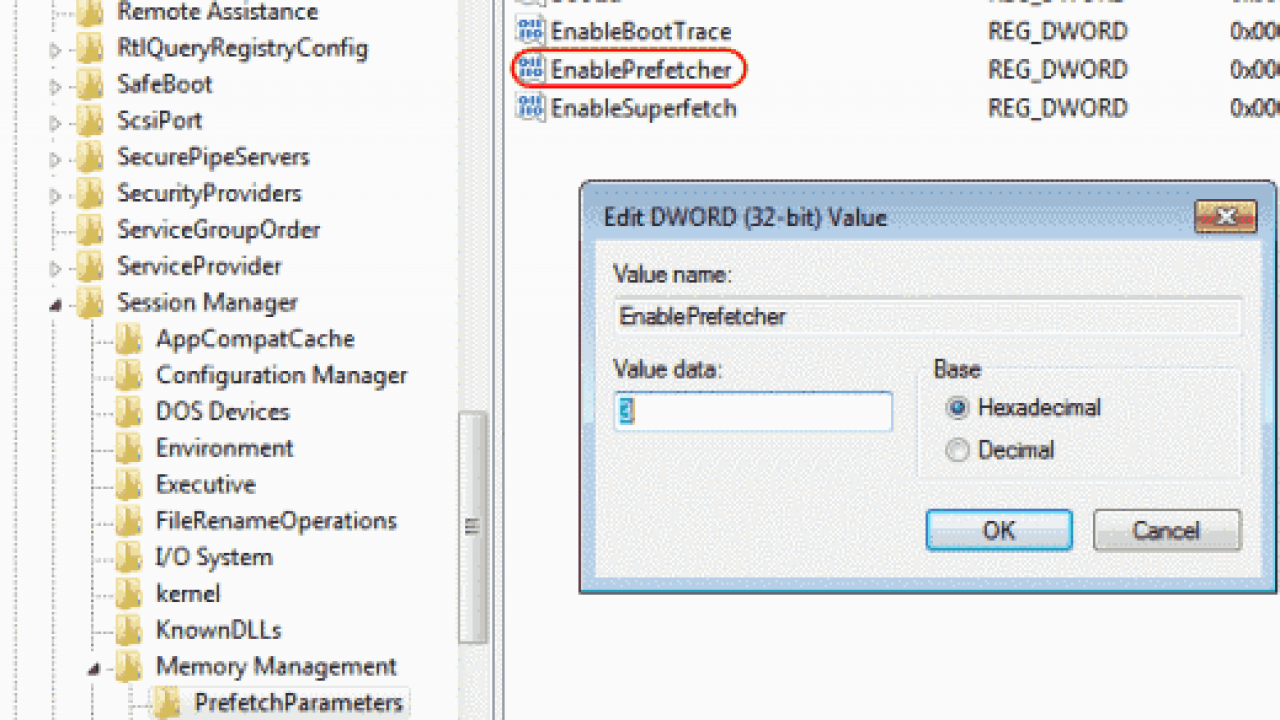
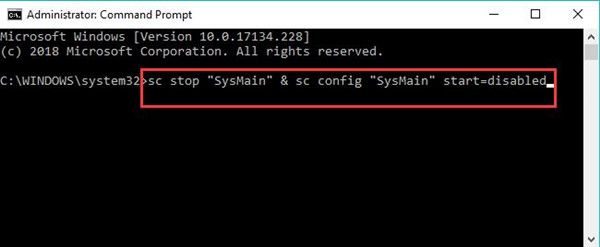
Superfetch 100% disk usage SOLVED - Driver Easy from images.drivereasy.com Click on ok to save the changes on your computer. To do that follow the instructions: In older builds of the os, it was called superfetch. Sc stop sysmain & sc config sysmain start=disabled To disable superfetch (sysmain) on windows 10: Enable or disable superfetch using registry. We do sysprep for cloning of new machines and looks like sysprep enables the service. Once again write command as sc config sysmain start=disabled and hit enter.
Press the windows key + r to open the run prompt, then type services.msc and click ok.
Double click on it to configure its properties. To disable superfetch in windows 10, do the following. Finally, your superfetch service or we can say the feature is disabled. In command prompt, copy and paste the following command and then hit enter to run this command to disable windows 10 superfetch. Disable superfetch using command prompt. Type services.msc into the run dialog and press enter to launch the services. For the first method, we need the standard services application, which can be launched by searching windows 10 or the run window, using the services command. Sc stop sysmain & sc config sysmain start=disabled 2 double click/tap on the sysmain service. (see screenshot below) starting with windows 10 build 17763.1, the superfetch service has been renamed to sysmain. Find the sysmain service in the list. You could also press windows + r, type services.msc and press enter. In the command prompt window, enter the following command line and press enter to turn off the superfetch service.
Some users have found that this high system and compressed disk usage is caused by a process called `speech runtime executable', which has to do with audio. You could also press windows + r, type services.msc and press enter. To disable superfetch in windows 10, do the following. There are scenarios wher you might want to disable superfetch in windows 10. Press the windows key + r to open the run prompt, then type services.msc and click ok.
How To Disable Fast Boot Windows 10 Command Prompt from www.technipages.com In command prompt, copy and paste the following command and then hit enter to run this command to disable windows 10 superfetch. In the command prompt window, enter the following command line and press enter to turn off the superfetch service. In older builds of the os, it was called superfetch. In run command window, type services.msc and click on ok. There are scenarios wher you might want to disable superfetch in windows 10. In order to do so, you need to: On superfetch properties screen, set the startup type to disabled. Enable or disable superfetch (sysmain) using command prompt.
Superfetch is a windows service that aims to improve system performance over time.
There are scenarios wher you might want to disable superfetch in windows 10. Finally, your superfetch service or we can say the feature is disabled. Press the windows logo key + r to open a run dialog. Disable superfetch using command prompt. Disable from services hold the windows key, while pressing r to bring up the rundialog box. To do that follow the instructions: So, this was the simple method to disable superfetch in an easy way. Enable or disable superfetch (sysmain) using command prompt. (see screenshot below) starting with windows 10 build 17763.1, the superfetch service has been renamed to sysmain. Double click on it to configure its properties. Double click on it to configure its properties. In the services window, scroll down to find the superfetch service. Press win + r shortcut keys on the keyboard to open the run dialog.
We do sysprep for cloning of new machines and looks like sysprep enables the service. If you prefer to work with the command line, there are a few simple commands you can use to enable or disable the superfetch service. Type command prompt in the search box and then right click it to run as administrator. Superfetch is a windows service that aims to improve system performance over time. You could also press windows + r, type services.msc and press enter.
What is Superfetch and How to Disable it on Windows 10 from windows10skill.com When the base image was used to clone new windows machine, superfetch was enabled and running on these new cloned machines. Enable or disable superfetch using registry. The superfetch service loads frequently used programs into memory for faster startups in windows 10. On it write the command as net.exe stop superfetch and hit enter to execute the command. Find the sysmain service in the list. First open a command prompt in administrator mode and then use the following commands: Double click on it to configure its properties. In the command prompt window, enter the following command line and press enter to turn off the superfetch service.
In older builds of the os, it was called superfetch.
To disable superfetch in windows 10, do the following. Press the windows logo key + r to open a run dialog. So, this was the simple method to disable superfetch in an easy way. Double click on it to configure its properties. Go to the windows menu and type cmd. The superfetch service was disabled and stopped from services.msc and same updated in regedit on golden image. Enable or disable superfetch in services 1 press the win + r keys to open run, type services.msc into run, and click/tap on ok to open services. Firstly, open the command prompt in the mode of the administrator. The superfetch service loads frequently used programs into memory for faster startups in windows 10. In order to do so, you need to: Type command prompt in the search box and then right click it to run as administrator. Disable superfetch from windows services app. In run command window, type services.msc and click on ok.